Authorized Distributor

Free Shipping For Orders Over $50

Manual vs Automatic Kiln Controllers: Which is Right for You?

When deciding upon which kiln to purchase, it’s easy to narrow your search based on obvious differences between models, such as size, energy requirements, and temperature maximums. However, an equally important attribute you shouldn’t disregard is kiln controller options.

There are two main types of controllers:

  • Manual controllers allow users to adjust the intensity on their own. 

  • Digital controllers automatically control kiln temperatures for their users.

Making an uninformed decision on this matter could result in an inability to properly fire the projects you plan to create.

Unsure of how to proceed? In this guide, we’ve broken down the benefits and drawbacks of each type of controller as well as given detailed descriptions of different controllers offered at Soul Ceramics. Whether you’re a professional or a hobbyist, we hope this guide will help match you with a controller that is most suitable for the glass or ceramics projects you plan on creating in your new kiln.

Important Terms to Know

Before we delve into the specifics of different controllers, there are some basic vocabulary terms you’ll need to know. Here are the most important ones to become familiar with:

What is a Pyrometer?

A pyrometer is essentially a high temperature thermometer. Pyrometers measure the temperature inside a kiln and are essential for firing glass projects. They exist in analog and digital form; an analog pyrometer is designed with an indicating needle, and is cheaper, and though a digital pyrometer is twice the price, it has a digital display which is much easier to read and get an accurate reading on. A pyrometer does not control the kiln in any way.

What is a Thermocouple?

The thermocouple is a device attached to a pyrometer that measures the temperature inside the kiln. The user places the thermocouple through a hole in the kiln brick so that it rests inside the kiln.

What is a Kiln Sitter?

The kiln sitter is a mechanical device used in ceramics to insure the kiln is shut off at the correct time. Pyrometers don’t work well with ceramic projects, because you need to know the “heat work” (temperature and timing) inside the kiln for proper firing. If an automatic controller is not in use, a kiln sitter can function as a sort of timer; a pyrometric cone is placed inside the kiln sitter, and when it has absorbed the proper amount of heat, it bends and and causes a lever in the kiln sitter to drop, turning off the kiln.

What is Cone Fire Mode?

The cone fire mode is a controller setting that allows the user to chose what cone the kiln will fire to as well as the speed at which the temperature change will occur.

What are Annealing Cycles?

As glass heats, it expands, and as it cools, it contracts, which creates a lot of stress within the material. To relieve this stress, which can lead to strain or breakage at room temperature, a controlled process to cool glass is necessary. This cooling process is known as annealing. After reaching the maximum temperature needed to fire a given glass piece, an anneal “soak” is necessary to achieve uniform temperature throughout the glass so that it doesn’t break; this is achieved through keeping the kiln at a given temperature until the interior and surface of the glass body equalize. Next, an anneal “cool” cycle - which gradually brings the kiln to room temperature - can take place.

What is the Soaking / Hold Period?

Just like an anneal soak, a “hold” or “soaking period” is a range of time when a kiln remains at a specific temperature so as to bring the internal temperature of the material up to the temperature of its exterior and not damage your work. Two other types of soak are a pre-rapid heat soak, which is designed to even out temperature before the quick ascent to a processing temperature, and a process soak, which keeps the glass at a consistent temperature at the maximum temperature during the firing process.

What is the Ramp / Hold Mode?

Many digital controllers will have this specific setting for holds as well as programming temperature changes. This setting allows you to choose the rate at which the temperature will change, by what degree, and what duration the kiln will stay at that temperature.

Diagnostic tools: These are controller capabilities that allow for a greater flow of information between the kiln and you; diagnostic tools keep the user informed during the firing process of the temperature, and relay other important environmental factors.

Manual Controllers

The most basic kinds of controllers available are manual ones. Until recently, most kilns shipped automatically with this configuration. A manual control has a simple on/off switch and a dial to adjust the firing time; this switch can be either an infinite switch with gradual increments or a dial switch that adjusts the interior to a low, medium, or high temperature setting. A thermocouple sits inside the kiln, and most manual controllers come with a pyrometer or kiln sitter so the user knows what temperature their kiln is firing at at any given time.

Manual Controller Pros

  • Easy to use: There’s no doubt that a manual controller is easier to use than a digital controller upon first use. Because of its basic design and simple switch, there’s no need for manual reading or stressing over whether you’ve input the correct program with your desired temperature limits and changes.

  • Constantly informs and keeps you involved: Manual controllers allow the user the most direct power and hands-on experience during the firing process. Because you are responsible for all condition changes in the kiln, you know exactly what is happening and you can easily document what programs worked and which did not when test firing. The pyrometer also insures that you are informed throughout the entire process.

  • Good price: Manual controllers are much cheaper than digital controllers. For projects where you don’t need the additional complexity of an automatic kiln controller, this is an economic choice.

Manual Controller Cons

  • Requires constant attention: When using a manual kiln controller, you can’t walk away for half a day and then return to a completed project. Manual controllers require you to be constantly monitoring your kiln, tracking temperature changes, and making note of each segment so that you can repeat or amend the program you’ve created when you wish to fire the same types of projects again. Because the user is responsible for all changes and programming with a manual controller, a lot of time will be spent observing your kiln and projects as they fire.

  • Inconsistent results: Due to the fact that manual controllers rely on the actions of humans, not precise machines, there is a much greater chance that recreating a firing program more than once will be unsuccessful. Recreating a program over and over again increases the opportunities for mistakes, and moving a dial instead of entering an exact number into a digital controller is not as precise, potentially leading to less than desirable results.

  • Everything is from scratch, every time: The power that manual controllers allow their users to have when it comes to creating their own firing procedures can really become inconvenient after a while. With no ability to input or save a new firing program, or to choose a pre-existing program, manual controllers can be a hassle to use if you’re firing frequently. Besides increasing the chances of mistakes, recreating a firing program each time you use your kiln can become burdensome and frustrating.

  • Incapable of complex firing processes: Manual controllers don’t have the ability to slowly and gradually decrease temperatures or properly hold annealing cycles of any kind. They also don’t have ramp/hold modes, making many projects near impossible to complete. If you are a ceramic artist with plans for more complex projects or a glass artist of any kind, you should steer clear of manual controllers.

Automatic / Digital Controllers

Electronic controllers take the responsibility off of the kiln owner to adjust temperatures, time temperature changes, and turn the kiln off once firing is complete. These devices will allow you to manipulate cone fire mode, set multiple segments in a ramp/hold schedule, program hold/soak mode at multiple temperatures and for variable periods of time, and skip steps in a firing schedule when necessary. Though these advanced capabilities prove advantageous in many respects, automatic controllers are not without their downsides.

Automatic/Digital Controller Pros

  • The work is done for you: Perhaps the best thing about digital controllers is that they allow the user to set or choose the schedule and program for firing all in one motion. For those less confident in their abilities to create and manage their own firing programs, or those who’d rather not spend the time manually managing a program every time they fire, digital controllers usually come pre-programmed with firing schedules for a multitude of different projects. This eliminates the need for time-wasting experimentation and inconsistencies that may occur with a manual controller. If you’d prefer to create your own programs, digital controllers also allow for this, but don’t require your presence past the initial programming. A controller can often store many different personalized programs you’ve formulated so you don’t need to worry about recreating firing schedules for a project you plan on doing more than once.

  • More reliable: Though manual controllers may give you a greater sense of control, they are unforgiving when you don't remember or respond promptly. An automatic controller eliminates much of the stress which comes with firing by assuring certain processes will happen at exactly the intended temperature at exactly the intended time. Instead of requiring constant monitoring, timer checking, and changing temperatures based on incomplete data, a user typically has greater peace of mind when using a controller that automatically does these things for them.

  • Necessary for annealing and complex programs: As mentioned above, a digital controller allows the user more control in setting the best programs for different projects and materials, delaying start time, skipping unnecessary steps during firing process, and holding at multiple temperatures for different periods of times. Additionally, while ceramics artists can get by without a digital controller, glass artists will find that annealing is near impossible with a manual controller. A digital controller provides consistent control, the ability to hold temperatures for annealing soaks, and can gradually decrease the temperature at a rate that doesn’t put your work in danger. Having a ramp/hold mode allows the user to chose the temperatures and rates without having to try and manually control the process.

  • Offers diagnostic tools: Digital controllers also offer the advantage of a wide array of tools that provide you with more information, more accurate temperatures, and solutions for fixing various problems that may arise in the kiln, and will be able to better inform you before and during the firing process.

  • Possibility of remote observation: Some of the best automatic controllers even allow you to track, monitor, and change your firing program while away from home. Using a computer, tablet, or smartphone, controllers with wifi will allow you to check in when you’re away from the studio, providing you the freedom to go about your day without having to constantly check on your kiln in person.

Automatic / Digital Controller Cons

  • Initially more difficult: Due to their complex programming capabilities, digital controllers can be difficult to use if you’re firing with one for the first time. Less technologically savvy artists may struggle throughout the first few firing processes or when trying to set a new program. Especially if you’re used to a manual controller, transitioning to a controller that requires much more input from you can be difficult at first. Though digital controllers are becoming increasingly more user friendly, it is good to remember that it may take between a few days and a few weeks (depending on your learning curve) before you feel comfortable using a new digital controller.

  • Higher cost: Automatic controllers are also more expensive than manual controllers. If the kiln you’re purchasing doesn’t include a controller in the price, coupling it with a digital controller will hike up your bill by another $100-$300, depending on which model is offered or available.

  • Might not be available: For many smaller kiln models, only manual controllers might be offered. While this is not a problem for larger kilns, if you are looking for a machine for test items or beads, or if this is your first kiln, it is much more likely you’ll not have the choice between a manual and digital controller.

Different Available Models

There are many different types of digital controllers available, ranging from those with basic automatic abilities to those with highly modern capabilities. Below are short descriptions of some of the different kinds of digital controllers Soul Ceramics offers with our kilns:

Set-Pro Controller

An economical electronic control option is the Set-Pro Control. This is a three-button system that allows the artist to use one of four individual firing programs. Each firing program offers up to 8 segments, giving ample opportunity to change temperature, speed of firing, and the length of time you’re firing. This is a good choice for an artist that requires more control and consistency than can be offered by a manual controller, but doesn’t want or need anything too complex.

Bartlett 3-Key Controller

Similar to the Set-Pro is the Bartlett 3-Key Controller, a simple but reliable controller with a three-button system. You select the cone you want to fire at, then choose one of four firing speeds - slow bisque, fast bisque, slow glaze, or fast glaze. The Bartlett also allows you to preheat, delay the firing start, skip a step, add time, hold, and set an alarm. This controller is commendable for its ease of use, and is also great for artists that require more structure than a manual controller can offer at a reasonable price.

Rampmaster Controller

Another electronic option is the Rampmaster Control, which allows the user to develop up to 6 individual firing programs. It is very user friendly, requiring the user to simply chose a cone number and firing speed which it then uses to automatically create a firing program. Each firing program offers up to 8 segments, letting you choose the speed, temperature, and length of time each segment lasts. It’s a quick, easy, and accurate option for artists looking for consistency and longer annealing cycles.

TAP Controller

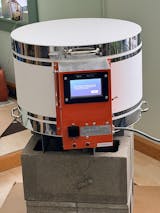
The Temperature Automation by Proportional-Integral Derivative (TAP) Control may sound complicated, but it’s capabilities go far beyond what artists could have imagined even ten years ago. Utilizing the most advanced kiln control technology available, the TAP Control includes an easy-to-read interactive touchscreen, technology ensuring precise firing, and wifi connection for the ability to develop and edit programs from a computer, tablet, or phone. It has more memory than any other controller, allowing you to more easily utilize, revise, and save many different kinds of firing programs. This controller is for the artist who has plans to create a variety of projects, including the most complex, and requires the utmost reliability, control, and consistency.

Genesis Controller

Another touch screen option is the Genesis Control, which is a slightly less extravagant device than the TAP Control but is still extremely capable of complex firing schedules. The Genesis has the ability to store up to 12 different programs with 32 segments per program, and allows to user to add segments, skip segments, and add temperature. The easy-to-follow screen descriptions and graphical display of firing processes make the Genesis Control a good choice for those who want the complexity of a smart controller with the ease of straightforward programing.

Now that you’re an expert on kiln controllers, it’s time to decide which is right for you! We hope this guide has helped you determine what type of controller your desired projects require, and please don’t hesitate to let us know if you have any other questions!