Authorized Distributor

Free Shipping For Orders Over $50

Handbuilding Pottery: Techniques and How to Do It

If you're looking to unleash your creativity and get your hands dirty, handbuilding pottery is the perfect activity for you.

This ancient technique involves creating pottery using only your hands, without the use of a pottery wheel.

Handbuilding pottery allows for a more organic and unique approach to creating ceramic pieces, as each piece is individually crafted and shaped by hand.


What is Handbuilding Pottery?

This technique predates the use of the pottery wheel and allows for a personalized approach to creating ceramic pieces.

knife carving a clay pot


What tools will I need for handbuilding pottery?

To begin with handbuilding pottery, you will need some essential tools. These include a rolling pin or slab roller, a pottery knife or wire cutter, a wooden modeling tool, and a sponge. These tools will assist you in shaping, cutting, and smoothing your clay to achieve the desired form and texture.

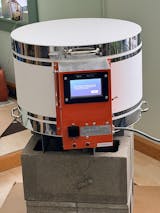
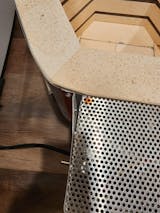
You will also need a kiln to fire ceramic work. Depending on your project and clay type, a kiln can take about 8 hours to heat up to about 2000 degrees Fahrenheit, and an additional 12 hours to cool down, so it’s important to know what kiln you need.


Handbuilding Pottery Techniques

One of the fundamental handbuilding techniques is pinch pottery. As the name suggests, this technique involves pinching the clay with your fingers to create various forms, such as bowls, vases, or cups.

Pinch pottery allows for unique shapes and finished pieces, as each piece is shaped entirely by hand.

Another popular handbuilding technique is coil pottery. With this technique, you roll long, thin coils of clay and layer them on top of one another to build up the walls of your pottery piece. This method is often used to create larger vessels such as pots or sculptures.

Slab pottery is yet another handbuilding technique where clay is rolled into flat, even sheets, which are then cut and assembled to create different shapes and forms. Slabs can be used to construct boxes, plates, tiles, or even wall hangings.

These are just a few examples of the basic handbuilding techniques you can experiment with. As you become more comfortable with these techniques, you can also combine them.


Step by Step Guide to Handbuilding Your Own Pottery

Now that you have a basic understanding of handbuilding pottery and the different techniques involved, here is a step-by-step guide on how to handbuild your own pottery.

Step 1: Prepare your clay

Start by preparing your clay. You can use either earthenware or stoneware clay, depending on the desired outcome. Knead the clay to remove any air bubbles and make it easier to work with.

Step 2: Choose your handbuilding technique

Decide which handbuilding technique you want to use for your pottery. Whether it's pinch pottery, coil building, or slab building, choose the technique that resonates with your artistic vision.

Step 3: Shape your clay

Begin shaping your clay using your chosen technique. For pinch pottery, use your fingers to gently pinch and shape the clay into your desired form.

For coil building, roll out thin coils and layer them on top of each other, smoothing the seams as you go.

For slab building, roll out even, flat sheets of clay and cut and assemble them to create your desired shape.

Step 4: Refine and smooth

Once you have your desired shape, use your handbuilding tools to refine and smooth the surface of your pottery. Smooth out any rough edges, blend seams, and add texture or design elements if desired.

Step 5: Allow your pottery to dry

Allow your handbuilt pottery to dry slowly and evenly. This will help prevent cracking during the drying process. Place your pottery on a drying rack or a piece of drywall to allow air to circulate around it.

Step 6: Bisque firing

Once your pottery is completely dry, it's time for the bisque firing. Place your pottery in a kiln and fire it at a low temperature to remove any remaining moisture and strengthen the clay.

Step 7: Glazing and final firing

After the bisque firing, it's time to glaze your pottery. Choose from a wide range of glazes to add color and texture to your creations. Once you've applied the glaze, fire your pottery one final time at a higher temperature to fuse the glaze to the clay.


What can you create using handbuilding techniques?

When it comes to handbuilding in pottery, the possibilities for creating decorative pieces are endless. Vases, wall hangings, and ornaments are just a few examples of what you can bring to life using this technique.

With handbuilding, you can let your imagination run wild as you explore different shapes, textures, and designs. Create a stunning ceramic vase that becomes the centerpiece of any room, or craft a unique wall hanging that adds personality to your home decor.

Additionally, use ornaments – perfect for adding a personal touch to your holiday decorations.

Another perfect solution for handbuilding is through creating sculptures. With your hands as your tools, you can mold clay into unusual forms that you would not normally be able to with a pottery wheel.

You can also create unique bowls and cups that do not have the uniformity of something that you would create on a wheel.

making shapes out of clay


Decorating Your Handbuilt Pottery: Tips and Ideas

One of the simplest and most effective ways to decorate your pottery is by using underglazes. You can apply them directly to the surface of your pottery using a brush or sponge.

Another fun technique is sgraffito, which involves scratching or carving into the surface of the clay to reveal the contrasting color underneath. You can use a pottery carving tool or even a toothpick to create detailed designs or patterns.

If you're feeling adventurous, you can experiment with different glazing techniques such as layering multiple glazes or using wax resist to create interesting patterns and textures.

Additionally, consider incorporating different materials into your pottery, such as beads, glass, or even metal accents. These additions can enhance the overall design of your pottery.

If you are interested in handbuilding pottery, it is likely that you will need some basic equipment to get your project started. At Soul Ceramics, we supply pottery glazes and kilns, perfect for making pottery at home or to use in a commercial setup.